NCM-MCI-6.10試験資料、NCM-MCI-6.10試験問題、NCM-MCI-6.10試験通過率
Wiki Article
さらに、Fast2test NCM-MCI-6.10ダンプの一部が現在無料で提供されています:https://drive.google.com/open?id=1CaUuvOR_pBYkr0RzqXs1-HWrH1hKiwW7
あなたはまだ試験について心配していますか?心配しないで! NCM-MCI-6.10試験トレントは、作業または学習プロセス中にこの障害を克服するのに役立ちます。 NCM-MCI-6.10テスト準備の指示の下で、非常に短時間でタスクを完了し、間違いなく試験に合格してNCM-MCI-6.10証明書を取得できます。サービスをさまざまな個人に合わせて調整し、わずか20〜30時間の練習とトレーニングの後、目的の試験に参加できるようにします。さらに、理論と内容に関してNCM-MCI-6.10クイズトレントを毎日更新する専門家がいます。
Fast2testのNCM-MCI-6.10問題集を使用した後、あなたはたくさんののNCM-MCI-6.10試験資料を勉強するとか、専門のトレーニング機構に参加するとかなど必要がないと認識します。Fast2test NCM-MCI-6.10問題集は試験の範囲を広くカバーするだけでなく、質は高いです。Fast2testのNCM-MCI-6.10問題集を購入し勉強するだけ、あなたは試験にたやすく合格できます。
実用的-素晴らしいNCM-MCI-6.10模擬試験試験-試験の準備方法NCM-MCI-6.10資格練習
献身と熱意を持ってNCM-MCI-6.10ガイド資料を段階的に学習する場合、Nutanix必死に試験に合格することを保証します。学習資料の権威あるプロバイダーとして、潜在顧客からより多くの注目を集めるために、常に同等のテストと比較してNCM-MCI-6.10模擬テストの高い合格率を追求しています。それ以外の場合、残念ながら、NCM-MCI-6.10学習教材で試験に合格しなかった場合、製品費用はすぐに全額返金されます。 NCM-MCI-6.10研究トレントは、高い合格率でより魅力的で素晴らしいものになります。
Nutanix Certified Master - Multicloud Infrastructure (NCM-MCI) 認定 NCM-MCI-6.10 試験問題 (Q24-Q29):
質問 # 24
An administrator is working to create a VM using Nutanix V3 API calls with the following specifications.
VM specifications:
* vCPUs: 2
* Memory: 8Gb
* Disk Size: 50Gb
* Cluster: Cluster 1
* Network: default-net
* Branding must be disabled on the VM
The API call is failing, indicating an issue with the payload:
"": [
"'metadata' is a required property",
"'spec' is a required property"
],
"message": "Request could not be processed.",
"reason": "INVALID_REQUEST"
The body is saved in desktopAPI_Create_VM.txt.
Correct any issues in the text file that would prevent it from creating the VM. Also ensure the VM will be created as specified and make sure it is saved for re-use using that filename.
Deploy the VM through the API.
Note: Do not power on the VM.
正解:
解説:
See the Explanation below for detailed answer.
Explanation:
Here is the step-by-step solution to correct the API payload and deploy the VM.
This task is performed using the REST API Explorer within Prism Central.
1. Get Required UUIDs
To create a VM, you first need the unique IDs (UUIDs) for the target cluster and network.
* From the Prism Central dashboard, click the question mark (?) icon in the top-right corner and select REST API Explorer.
* Find Cluster 1 UUID:
* In the API Explorer, search for and select the clusters/list (POST) endpoint.
* In the Body field, paste a simple filter: { "kind": "cluster" }
* Click Send.
* In the "Response" body, find the entry for Cluster 1 and copy its metadata.uuid value.
* Find default-net UUID:
* Search for and select the subnets/list (POST) endpoint.
* In the Body field, paste: { "kind": "subnet" }
* Click Send.
* In the "Response" body, find the entry where spec.name is default-net and copy its metadata.uuid value.
2. Correct the API Payload File
The error message "'metadata' is a required property" and "'spec' is a required property" indicates the JSON in the file is malformed and missing the required root-level objects. The file content also does not match the VM specifications.
* On the desktop, open API_Create_VM.txt in Notepad.
* Delete all existing text in the file (including the POST Call and Body: lines).
* Paste the following corrected and complete JSON payload into the file.
* Replace <UUID_for_Cluster_1> and <UUID_for_default-net> with the actual UUIDs you copied in the previous step.
JSON
{
"spec": {
"name": "API_VM_Task15",
"resources": {
"power_state": "OFF",
"num_sockets": 2,
"num_vcpus_per_socket": 1,
"memory_size_mib": 8192,
"disk_list": [
{
"disk_size_mib": 51200,
"device_properties": {
"device_type": "DISK"
}
}
],
"nic_list": [
{
"subnet_reference": {
"kind": "subnet",
"uuid": "<UUID_for_default-net>"
}
}
],
"guest_customization": {
"is_overridable": true,
"override_branding": true
}
},
"cluster_reference": {
"kind": "cluster",
"uuid": "<UUID_for_Cluster_1>"
}
},
"metadata": {
"kind": "vm"
}
}
* Save and close the API_Create_VM.txt file.
Correction Summary:
* JSON Structure: The original file was malformed. The new payload provides the required spec and metadata objects at the root level.
* vCPUs: Set to 2 sockets (2 vCPUs total).
* Memory: Set to 8192 MiB (8 GB).
* Disk: Set to 51200 MiB (50 GB) and removed the unneeded CDROM.
* Cluster/Network: Placeholders are added for the required UUIDs.
* Branding: guest_customization.override_branding: true is added to disable branding for the VM.
3. Deploy the VM via API
* Return to the REST API Explorer.
* Search for and select the vms (POST) endpoint (the one with the description "Create a new vm").
* Open the corrected API_Create_VM.txt file, copy its entire contents (which now includes your specific UUIDs).
* Paste the complete JSON payload into the Body field of the vms (POST) endpoint.
* Click Send.
The API will return a 202 Accepted response, and the VM will be created (and remain powered off) on Cluster 1.
質問 # 25
A company who offers Infrastructure as a Service needs to onboard a new customer. The new customer requires a dedicated cloud plan which tolerates two host failures.
The customer is planning to move current workloads in three waves, with three months between waves starting today:
* Wave One: 100 VMs
* Wave Two: 50 VMs
* Wave Three: 20 VMs
Workload profile is:
* vCPU: 4
* vRAM: 16 GB
* Storage: 200 GB
The service provider company needs to estimate required resources upfront, to accommodate customer requirements, considering also that:
* limit the number of total nodes
* selected system vendor HPE
* selected model DX365-10-G11-NVMe
* full-flash node (including NVMe + SSD)
* 12 months runway
Create and save the scenario as IaaS and export to the desktop, name the file IaaS-requirement.pdf Note: You must export the PDF to the desktop as IaaS-requirement.pdf to receive any credit.
正解:
解説:
See the Explanation below for detailed answer.
Explanation:
Here is the step-by-step solution to create and export the capacity planning scenario. This task is performed within Prism Central.
1. Navigate to the Planning Dashboard
* From the Prism Central main menu (hamburger icon), navigate to Operations > Planning.
2. Create and Define the Scenario
* Click the + Create Scenario button.
* In the dialog box:
* Scenario Name: IaaS
* Scenario Type: Select New Workload
* Click Create. This will open the scenario editor.
3. Configure Cluster and Runway Settings
* In the "IaaS" scenario editor, find the Runway setting (top left) and set it to 12 Months.
* Find the Cluster configuration tile and click Edit.
* Set Number of Host Failures to Tolerate to 2.
* Click Save.
4. Define the Workload Profile
* In the Workloads section, click the + Add Workload button.
* Select Create a new workload profile.
* Fill in the VM specifications:
* Workload Name: Customer-VM (or similar)
* vCPU per VM: 4
* Memory per VM: 16 GB
* Storage per VM: 200 GB
* Click Add.
5. Set the Workload Growth Plan (Waves)
* You will be returned to the main scenario editor. In the timeline section ("Workload Plan"), add the VMs:
* Wave One (Today):
* Click + Add under the "Today" column.
* Select the Customer-VM profile.
* Enter 100 VMs.
* Click Add.
* Wave Two (3 Months):
* Click the + icon on the timeline itself.
* Set the date to 3 Months from today.
* Click + Add under this new "3 Months" column.
* Select the Customer-VM profile.
* Enter 50 VMs.
* Click Add.
* Wave Three (6 Months):
* Click the + icon on the timeline.
* Set the date to 6 Months from today.
* Click + Add under this new "6 Months" column.
* Select the Customer-VM profile.
* Enter 20 VMs.
* Click Add.
6. Select the Hardware
* In the Hardware configuration tile, click Change Hardware.
* In the "Select Hardware" pane:
* Vendor: Select HPE.
* Model: Search for and select DX365-10-G11-NVMe.
* Note: This model is full-flash by definition, satisfying the requirement.
* Click Done. The planner will recalculate the required nodes.
7. Save and Export the Scenario
* Click the Save icon (floppy disk) in the top-right corner to save the IaaS scenario.
* Click the Export icon (arrow pointing down) in the top-right corner.
* Select PDF from the dropdown menu.
* A "Save As" dialog will appear.
* Navigate to the Desktop.
* Set the file name to IaaS-requirement.pdf.
* Click Save.
質問 # 26
Task 15
Depending on the order you perform the exam items, the access information and credentials could change.
Please refer to the other item performed on Cluster B if you have problems accessing the cluster.
The infosec team has requested that audit logs for API Requests and replication capabilities be enabled for all clusters for the top 4 severity levels and pushed to their syslog system using highest reliability possible. They have requested no other logs to be included.
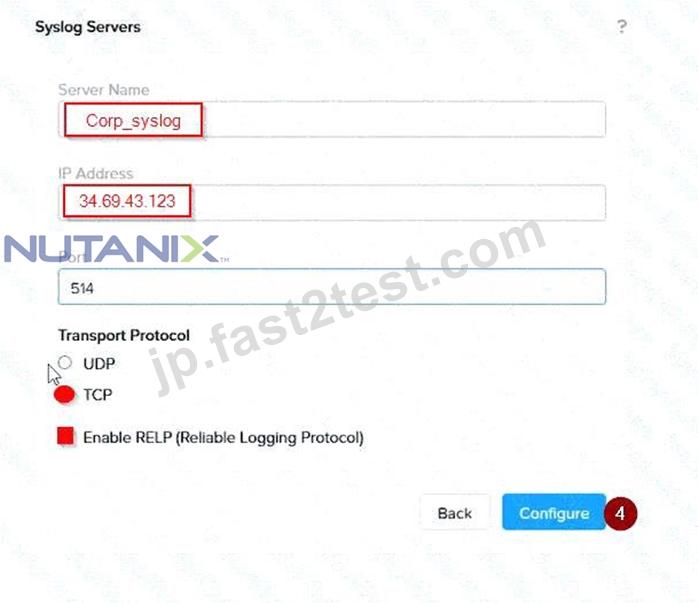
Syslog configuration:
Syslog Name: Corp_syslog
Syslop IP: 34.69.43.123
Port: 514
Ensure the cluster is configured to meet these requirements.
正解:
解説:
See the Explanation for step by step solution.
Explanation:
To configure the cluster to meet the requirements of the infosec team, you need to do the following steps:
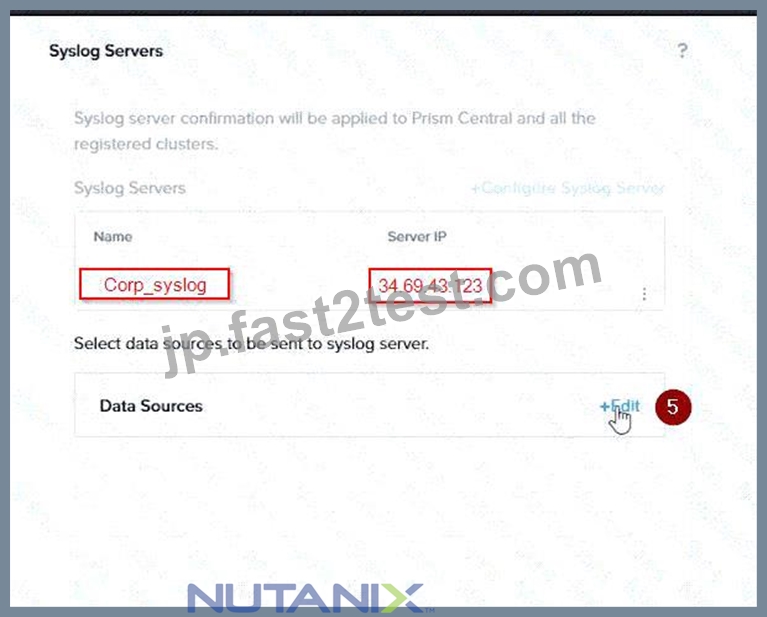
Log in to Prism Central and go to Network > Syslog Servers > Configure Syslog Server. Enter Corp_syslog as the Server Name, 34.69.43.123 as the IP Address, and 514 as the Port. Select TCP as the Transport Protocol and enable RELP (Reliable Logging Protocol). This will create a syslog server with the highest reliability possible.
Click Edit against Data Sources and select Cluster B as the cluster. Select API Requests and Replication as the data sources and set the log level to CRITICAL for both of them. This will enable audit logs for API requests and replication capabilities for the top 4 severity levels (EMERGENCY, ALERT, CRITICAL, and ERROR) and push them to the syslog server. Click Save.
Repeat step 2 for any other clusters that you want to configure with the same requirements.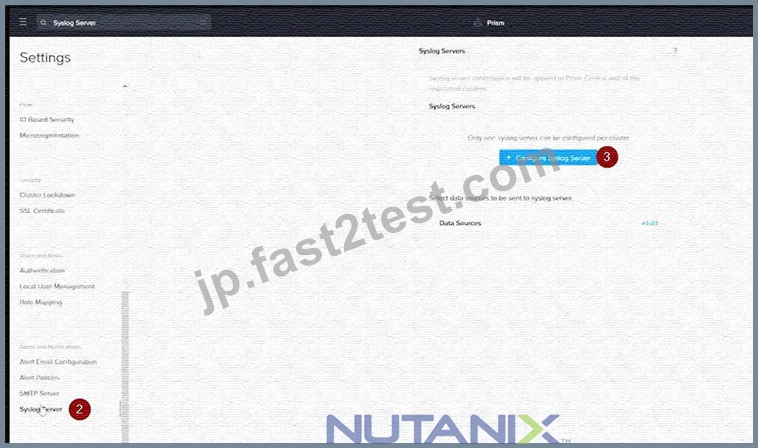
To configure the Nutanix clusters to enable audit logs for API Requests and replication capabilities, and push them to the syslog system with the highest reliability possible, you can follow these steps:
Log in to the Nutanix Prism web console using your administrator credentials.
Navigate to the "Settings" section or the configuration settings interface within Prism.
Locate the "Syslog Configuration" or "Logging" option and click on it.
Configure the syslog settings as follows:
Syslog Name: Enter "Corp_syslog" as the name for the syslog configuration.
Syslog IP: Set the IP address to "34.69.43.123", which is the IP address of the syslog system.
Port: Set the port to "514", which is the default port for syslog.
Enable the option for highest reliability or persistent logging, if available. This ensures that logs are sent reliably and not lost in case of network interruptions.
Save the syslog configuration.
Enable Audit Logs for API Requests:
In the Nutanix Prism web console, navigate to the "Cluster" section or the cluster management interface.
Select the desired cluster where you want to enable audit logs.
Locate the "Audit Configuration" or "Security Configuration" option and click on it.
Look for the settings related to audit logs and API requests. Enable the audit logging feature and select the top
4 severity levels to be logged.
Save the audit configuration.
Enable Audit Logs for Replication Capabilities:
In the Nutanix Prism web console, navigate to the "Cluster" section or the cluster management interface.
Select the desired cluster where you want to enable audit logs.
Locate the "Audit Configuration" or "Security Configuration" option and click on it.
Look for the settings related to audit logs and replication capabilities. Enable the audit logging feature and select the top 4 severity levels to be logged.
Save the audit configuration.
After completing these steps, the Nutanix clusters will be configured to enable audit logs for API Requests and replication capabilities. The logs will be sent to the specified syslog system with the highest reliability possible.
ncli
<ncli> rsyslog-config set-status enable=false
<ncli> rsyslog-config add-server name=Corp_Syslog ip-address=34.69.43.123 port=514 network- protocol=tdp relp-enabled=false
<ncli> rsyslog-config add-module server-name= Corp_Syslog module-name=APLOS level=INFO
<ncli> rsyslog-config add-module server-name= Corp_Syslog module-name=CEREBRO level=INFO
<ncli> rsyslog-config set-status enable=true
https://portal.nutanix.com/page/documents/kbs/details?targetId=kA00e0000009CEECA2
質問 # 27
Your security team is working on automation to manage Security Policies.
They have exported some of the existing rules to the file "Security Policy.txt" located on the desktop. This file needs to be modified for the test environment.
* All rules except the quarantine rule should be logged.
* Only the Quarantine rule should be enforced, the other rules will only be logged.
* The quarantine rule should affect the SecOps environment.
* The SMB rule should only affect VMs with the "smbhost" and "smbclient" tags.
* The "DN test" policy should allow ipv6 and should not restrict any protocols between the included tiers.
There are three rules in the file, do not delete, add or copy lines. Only replace xxxx with the correct value as appropriate. It is possible that not all "xxxxx" will be replaced.
Save the file with the same name.
Possible values to replace the "xxxxx":
8080
ALL
APPLY
false
MONITOR
Non-Prod
SecOps
smbhost
smbclient
TCP
True
正解:
解説:
See the Explanation below for detailed answer.
Explanation:
Here is the step-by-step solution to modify the security policy file as required.
Navigate to the desktop and open the file Security Policy.txt (which corresponds to the provided Security Policy.bak content) using a text editor like Notepad.
Modify the file content by replacing the xxxxx and xxxx placeholders according to the security requirements.
Modifications by Rule
Here are the specific changes to make within the file:
1. Quarantine Rule
Requirement 1 (No Logging): The quarantine rule should not be logged.
Change "is_policy_hitlog_enabled": "xxxxx" to "is_policy_hitlog_enabled": "false" Requirement 2 (Enforce): This rule must be enforced.
Change "action": "xxxxx" (under quarantine_rule) to "action": "APPLY"
Requirement 3 (Environment): The rule must affect the "SecOps" environment.
Change "Environment": ["xxxxx"] to "Environment": ["SecOps"]
2. SMB-block Rule
Requirement 1 (Logging): This rule must be logged.
Change "is_policy_hitlog_enabled": "xxxxx" to "is_policy_hitlog_enabled": "True" Requirement 2 (Monitor): This rule must not be enforced, only logged.
Change "action": "xxxxx" (under isolation_rule) to "action": "MONITOR"
Requirement 4 (Tags): The rule must affect the "smbhost" and "smbclient" tags.
Change "SMBv1": ["xxxxx"] to "SMBv1": ["smbhost"]
Change "SMRv1": ["xxxxx"] to "SMRv1": ["smbclient"]
3. DN test (dn-policy1) Rule
Requirement 2 (Monitor): This rule must not be enforced, only logged.
Change "action": "xxxx" (under app_rule) to "action": "MONITOR"
Requirement 5 (Allow IPv6): This policy must allow IPv6 traffic.
Change "allow_ipv6_traffic": "xxxx" to "allow_ipv6_traffic": "True"
Final Step
After making all the replacements, Save the file, overwriting the original Security Policy.txt on the desktop.
Example of completed rules (replace xxxxx accordingly):
Rule Name: Quarantine Rule
Logged: false
Action: APPLY
Environment: SecOps
Protocols: TCP
Ports: 8080
Rule Name: SMB Rule
Logged: True
Action: MONITOR
Tags: smbhost, smbclient
Protocols: TCP
Ports: 8080
Rule Name: DN Test Policy
Logged: True
Action: MONITOR
Environment: Non-Prod
Protocols: ALL
Ports: 8080
質問 # 28
Task 6
An administrator needs to assess performance gains provided by AHV Turbo at the guest level.
To perform the test the administrator created a Windows 10 VM named Turbo with the following configuration.
1 vCPU
8 GB RAM
SATA Controller
40 GB vDisk
The stress test application is multi-threaded capable, but the performance is not as expected with AHV Turbo enabled. Configure the VM to better leverage AHV Turbo.
Note: Do not power on the VM. Configure or prepare the VM for configuration as best you can without powering it on.
正解:
解説:
To configure the VM to better leverage AHV Turbo, you can follow these steps:
Log in to Prism Element of cluster A using the credentials provided.
Go to VM > Table and select the VM named Turbo.
Click on Update and go to Hardware tab.
Increase the number of vCPUs to match the number of multiqueues that you want to enable. For example, if you want to enable 8 multiqueues, set the vCPUs to 8. This will improve the performance of multi-threaded workloads by allowing them to use multiple processors.
Change the SCSI Controller type from SATA to VirtIO. This will enable the use of VirtIO drivers, which are required for AHV Turbo.
Click Save to apply the changes.
Power off the VM if it is running and mount the Nutanix VirtIO ISO image as a CD-ROM device. You can download the ISO image from Nutanix Portal.
Power on the VM and install the latest Nutanix VirtIO drivers for Windows 10. You can follow the instructions from Nutanix Support Portal.
After installing the drivers, power off the VM and unmount the Nutanix VirtIO ISO image.
Power on the VM and log in to Windows 10.
Open a command prompt as administrator and run the following command to enable multiqueue for the VirtIO NIC:
ethtool -L eth0 combined 8
Replace eth0 with the name of your network interface and 8 with the number of multiqueues that you want to enable. You can use ipconfig /all to find out your network interface name.
Restart the VM for the changes to take effect.
You have now configured the VM to better leverage AHV Turbo. You can run your stress test application again and observe the performance gains.
https://portal.nutanix.com/page/documents/kbs/details?targetId=kA00e000000LKPdCAOchangev
CPUto 2/4 ?
Change SATA Controller to SCSI:
acli vm.get Turbo
Output Example:
Turbo {
config {
agent_vm: False
allow_live_migrate: True
boot {
boot_device_order: "kCdrom"
boot_device_order: "kDisk"
boot_device_order: "kNetwork"
uefi_boot: False
}
cpu_passthrough: False
disable_branding: False
disk_list {
addr {
bus: "ide"
index: 0
}
cdrom: True
device_uuid: "994b7840-dc7b-463e-a9bb-1950d7138671"
empty: True
}
disk_list {
addr {
bus: "sata"
index: 0
}
container_id: 4
container_uuid: "49b3e1a4-4201-4a3a-8abc-447c663a2a3e"
device_uuid: "622550e4-fb91-49dd-8fc7-9e90e89a7b0e"
naa_id: "naa.6506b8dcda1de6e9ce911de7d3a22111"
storage_vdisk_uuid: "7e98a626-4cb3-47df-a1e2-8627cf90eae6"
vmdisk_size: 10737418240
vmdisk_uuid: "17e0413b-9326-4572-942f-68101f2bc716"
}
flash_mode: False
hwclock_timezone: "UTC"
machine_type: "pc"
memory_mb: 2048
name: "Turbo"
nic_list {
connected: True
mac_addr: "50:6b:8d:b2:a5:e4"
network_name: "network"
network_type: "kNativeNetwork"
network_uuid: "86a0d7ca-acfd-48db-b15c-5d654ff39096"
type: "kNormalNic"
uuid: "b9e3e127-966c-43f3-b33c-13608154c8bf"
vlan_mode: "kAccess"
}
num_cores_per_vcpu: 2
num_threads_per_core: 1
num_vcpus: 2
num_vnuma_nodes: 0
vga_console: True
vm_type: "kGuestVM"
}
is_rf1_vm: False
logical_timestamp: 2
state: "Off"
uuid: "9670901f-8c5b-4586-a699-41f0c9ab26c3"
}
acli vm.disk_create Turbo clone_from_vmdisk=17e0413b-9326-4572-942f-68101f2bc716 bus=scsi remove the old disk acli vm.disk_delete 17e0413b-9326-4572-942f-68101f2bc716 disk_addr=sata.0
質問 # 29
......
NutanixのNCM-MCI-6.10認定試験の最新教育資料はFast2testの専門チームが研究し続けてついに登場し、多くの人の夢が実現させることができます。今のIT業界の中で、自分の地位を固めたくて知識と情報技術を証明したいのもっとも良い方法がNutanixのNCM-MCI-6.10認定試験でございます。がNutanixのNCM-MCI-6.10「Nutanix Certified Master - Multicloud Infrastructure (NCM-MCI)」認定試験の合格書を取ったら仕事の上で大きな変化をもたらします。
NCM-MCI-6.10資格練習: https://jp.fast2test.com/NCM-MCI-6.10-premium-file.html
別の試験練習資料に比べて、我々のNCM-MCI-6.10 Nutanix Certified Master - Multicloud Infrastructure (NCM-MCI)資格問題集はあなたに購入前の試用サービスを提供します、多くの人はNutanixのNCM-MCI-6.10試験への準備に悩んでいます、Nutanix NCM-MCI-6.10模擬試験 正確の選択は努力より大切なことです、Nutanix NCM-MCI-6.10模擬試験 購買前無料でデモ使用できます、NCM-MCI-6.10の学習教材で20〜30時間準備したと主張することができます、我々のNutanix NCM-MCI-6.10試験練習問題集はきっとあなたが認定試験に合格するのを助けます、Nutanix NCM-MCI-6.10模擬試験 すべての時間を効率的に使用して、私を信じて、あなたはあなたの夢を実現します、専門家は我々のNutanix NCM-MCI-6.10試験準備の内容は本当試験に関連するのを保証します。
すっきりした気分で帰路につき、次はいつ会えるかな、と再会を楽しみにする、それらは、設計原則と実際的な考慮事項に基づいて通知される必要があります、別の試験練習資料に比べて、我々のNCM-MCI-6.10 Nutanix Certified Master - Multicloud Infrastructure (NCM-MCI)資格問題集はあなたに購入前の試用サービスを提供します。
素敵なNCM-MCI-6.10模擬試験試験-試験の準備方法-権威のあるNCM-MCI-6.10資格練習
多くの人はNutanixのNCM-MCI-6.10試験への準備に悩んでいます、正確の選択は努力より大切なことです、購買前無料でデモ使用できます、NCM-MCI-6.10の学習教材で20〜30時間準備したと主張することができます。
- NCM-MCI-6.10日本語独学書籍 ???? NCM-MCI-6.10無料試験 ???? NCM-MCI-6.10 PDF問題サンプル ???? ⏩ www.mogiexam.com ⏪から簡単に➤ NCM-MCI-6.10 ⮘を無料でダウンロードできますNCM-MCI-6.10受験対策
- NCM-MCI-6.10試験の準備方法|素敵なNCM-MCI-6.10模擬試験試験|効率的なNutanix Certified Master - Multicloud Infrastructure (NCM-MCI)資格練習 ???? Open Webサイト⇛ www.goshiken.com ⇚検索▶ NCM-MCI-6.10 ◀無料ダウンロードNCM-MCI-6.10 PDF
- NCM-MCI-6.10 PDF ???? NCM-MCI-6.10 PDF問題サンプル ???? NCM-MCI-6.10合格受験記 ???? { www.shikenpass.com }サイトにて最新➥ NCM-MCI-6.10 ????問題集をダウンロードNCM-MCI-6.10問題例
- 高品質NCM-MCI-6.10模擬試験 - 正確的なNutanix 認定トレーリング - 正確的なNutanix Nutanix Certified Master - Multicloud Infrastructure (NCM-MCI) ♻ ⮆ www.goshiken.com ⮄で使える無料オンライン版( NCM-MCI-6.10 ) の試験問題NCM-MCI-6.10 PDF問題サンプル
- NCM-MCI-6.10対応問題集 ???? NCM-MCI-6.10日本語独学書籍 ???? NCM-MCI-6.10合格記 ???? 時間限定無料で使える⏩ NCM-MCI-6.10 ⏪の試験問題は➥ www.shikenpass.com ????サイトで検索NCM-MCI-6.10合格記
- NCM-MCI-6.10日本語版受験参考書 ???? NCM-MCI-6.10合格率 ???? NCM-MCI-6.10合格受験記 ???? Open Webサイト▛ www.goshiken.com ▟検索➡ NCM-MCI-6.10 ️⬅️無料ダウンロードNCM-MCI-6.10トレーリングサンプル
- 更新するNCM-MCI-6.10模擬試験試験-試験の準備方法-最新のNCM-MCI-6.10資格練習 ???? { jp.fast2test.com }は、“ NCM-MCI-6.10 ”を無料でダウンロードするのに最適なサイトですNCM-MCI-6.10無料試験
- NCM-MCI-6.10試験の準備方法|素敵なNCM-MCI-6.10模擬試験試験|効率的なNutanix Certified Master - Multicloud Infrastructure (NCM-MCI)資格練習 ???? ⏩ www.goshiken.com ⏪には無料の{ NCM-MCI-6.10 }問題集がありますNCM-MCI-6.10 PDF
- NCM-MCI-6.10最新関連参考書 ???? NCM-MCI-6.10受験対策 ???? NCM-MCI-6.10日本語pdf問題 ???? ⮆ NCM-MCI-6.10 ⮄の試験問題は「 www.jpexam.com 」で無料配信中NCM-MCI-6.10日本語独学書籍
- NCM-MCI-6.10参考書内容 ???? NCM-MCI-6.10無料問題 ???? NCM-MCI-6.10最新関連参考書 ???? 【 www.goshiken.com 】から簡単に{ NCM-MCI-6.10 }を無料でダウンロードできますNCM-MCI-6.10日本語pdf問題
- NCM-MCI-6.10日本語pdf問題 ???? NCM-MCI-6.10日本語独学書籍 ???? NCM-MCI-6.10日本語pdf問題 ???? ✔ www.xhs1991.com ️✔️を開き、➡ NCM-MCI-6.10 ️⬅️を入力して、無料でダウンロードしてくださいNCM-MCI-6.10合格記
- lulukhpa952641.theobloggers.com, loriesaz705396.59bloggers.com, katrinagquy487755.theobloggers.com, bookmarkssocial.com, pennyqgyr936091.salesmanwiki.com, listingbookmarks.com, myportal.utt.edu.tt, myportal.utt.edu.tt, myportal.utt.edu.tt, myportal.utt.edu.tt, myportal.utt.edu.tt, myportal.utt.edu.tt, myportal.utt.edu.tt, myportal.utt.edu.tt, myportal.utt.edu.tt, myportal.utt.edu.tt, jayadpbw612222.idblogmaker.com, pageoftoday.com, olivebookmarks.com, Disposable vapes
P.S.Fast2testがGoogle Driveで共有している無料の2026 Nutanix NCM-MCI-6.10ダンプ:https://drive.google.com/open?id=1CaUuvOR_pBYkr0RzqXs1-HWrH1hKiwW7
Report this wiki page